Record Videos with Puppeteer: Step-by-Step Guide

Updated at April 03, 2026 | 7 min read
Updated at April 03, 2026 | 7 min read
Recording a website video can be really helpful for things like demos, testing how users interact with a site, or tracking changes. Puppeteer is a tool made by Google for Node.js that lets you control the Chrome browser with code. You can use it to do things like click buttons, scroll, fill out forms, or take screenshots. However, Puppeteer doesn’t directly support video recording. To capture videos, you need to use extra tools like FFmpeg. In this guide, we’ll first show how to set up Puppeteer for video recording, and then explain how ScreenshotAPI makes the whole process much easier with just a few simple API calls.
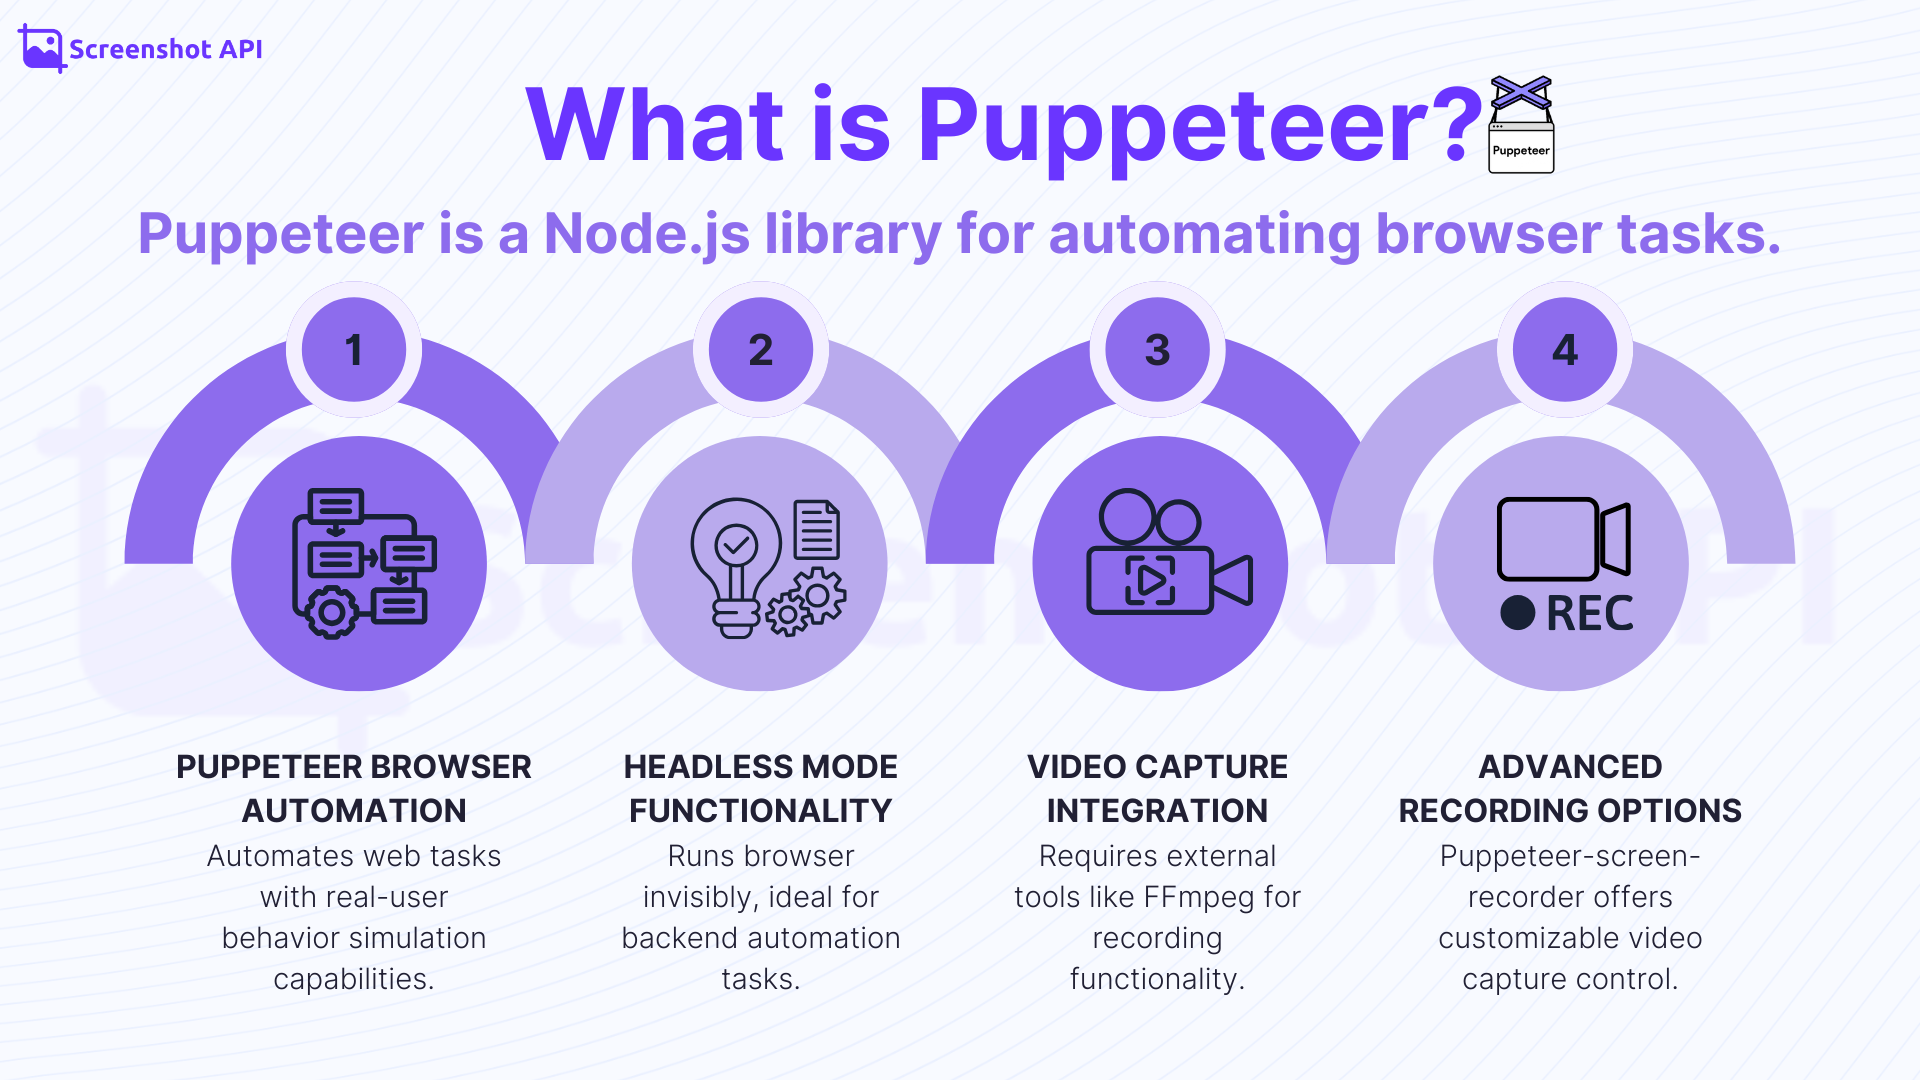
Puppeteer is a headless-browser automation library. As the official docs state, “Puppeteer is a JavaScript library which provides a high-level API to control Chrome or Firefox over the DevTools Protocol”. In real use, you write Node.js code that starts Chrome (usually without showing the browser window) and then tells it what to do like open pages, click buttons, or fill out forms. Puppeteer is often used for things like web scraping, testing, making PDFs, or taking screenshots. While it usually runs in the background (headless), you can also make it show the browser (headful) if needed. Puppeteer gives full control over the browser, letting you copy real user actions and even capture the entire page, not just the part you see on screen.
Recording video in Puppeteer is a complex process that involves multiple steps and external tools. If you prefer an easier solution, click here.
Puppeteer itself doesn’t record video, so you need to set up screen capture. The basic process is:
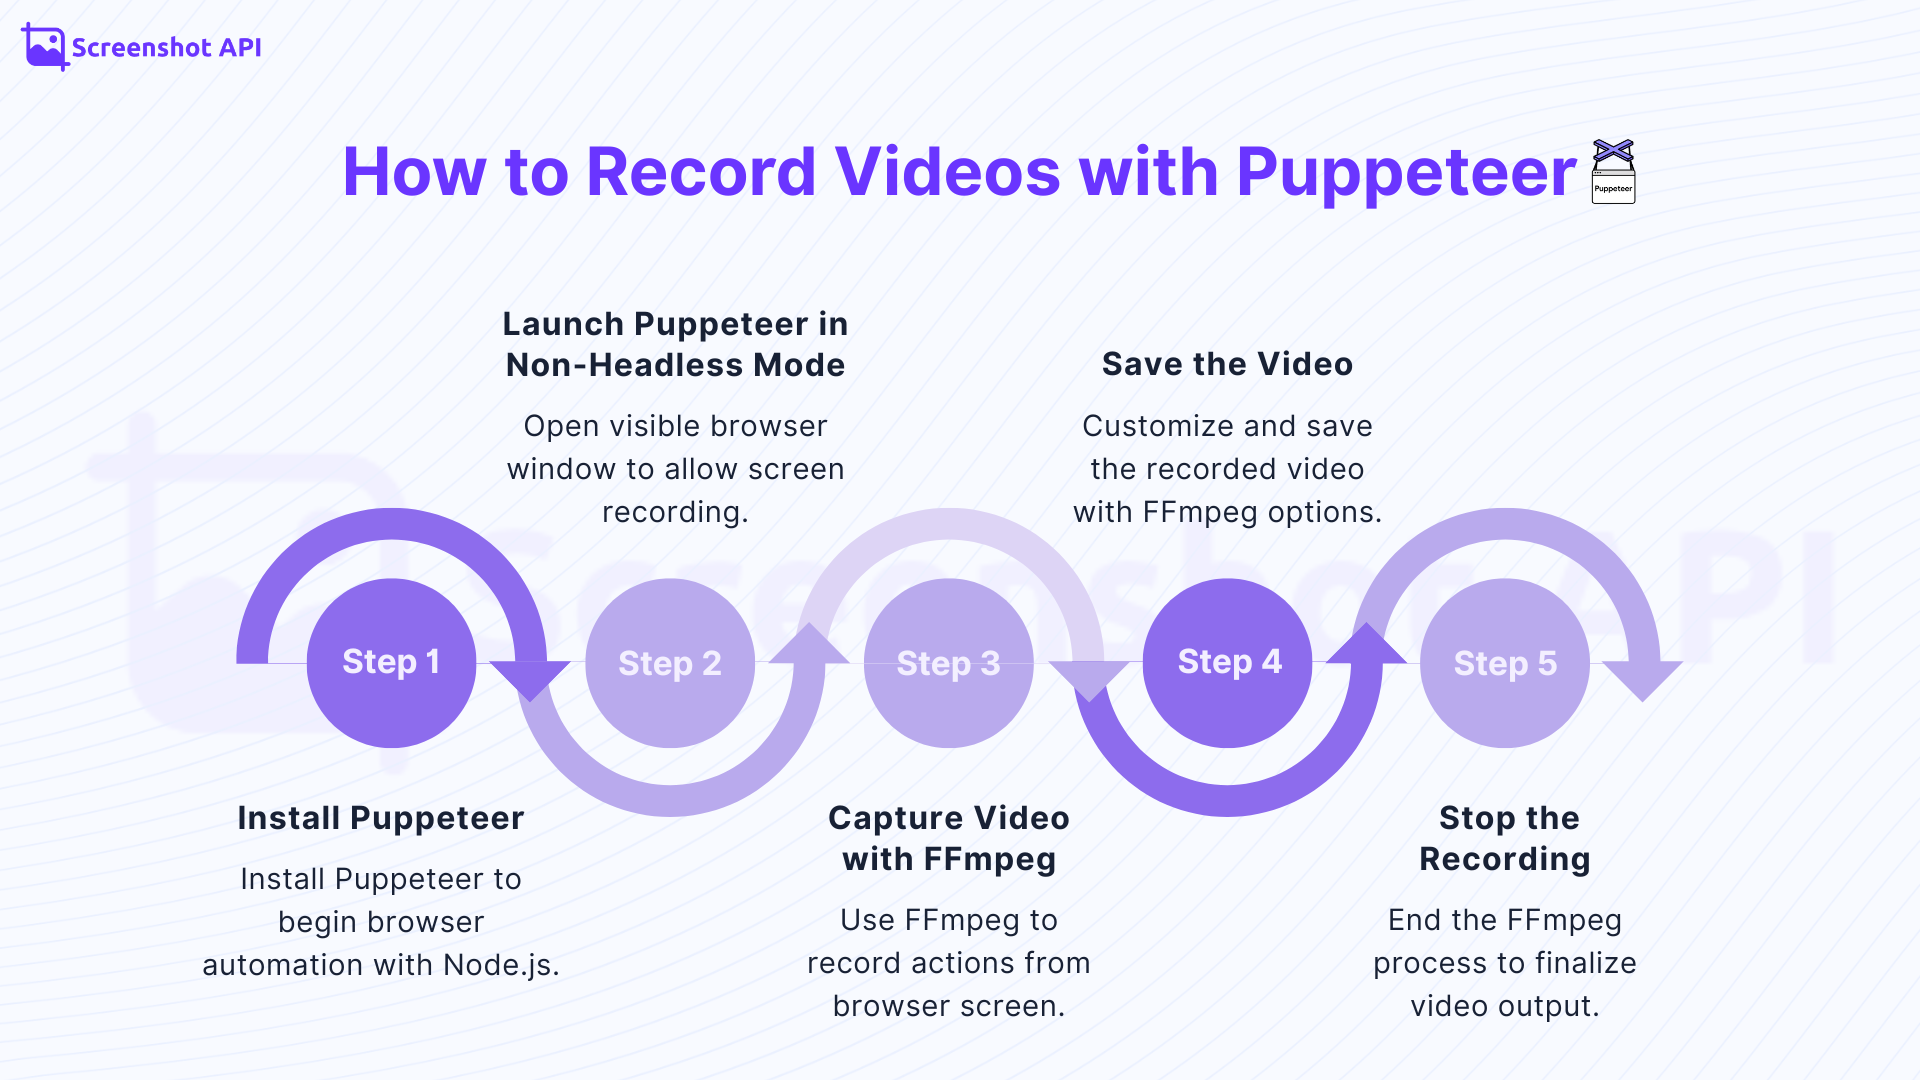
In your Node.js project, install Puppeteer with:
npm install puppeteerThis will download Puppeteer and a compatible version of Chrome/Chromium.
Video capture requires seeing the browser. Launch Puppeteer with headless: false:
const puppeteer = require('puppeteer');
(async () => {
  const browser = await puppeteer.launch({ headless: false });
  const page = await browser.newPage();
  await page.goto('https://example.com');
  // You can interact with the page here (click, scroll, etc.)
})();
This opens a visible Chrome window for recording.
Puppeteer doesn’t record frames, so use FFmpeg to capture the window. Install an FFmpeg wrapper (fluent-ffmpeg):
npm install fluent-ffmpegThen, in your script, start FFmpeg pointing at the Puppeteer browser window. For example:
const ffmpeg = require('fluent-ffmpeg');
(async () => {
  const browser = await puppeteer.launch({ headless: false });
  const page = await browser.newPage();
  await page.goto('https://example.com');
  // Start recording the screen
  ffmpeg()
    .input('screen-capture-stream')   // this links to Puppeteer’s output
    .output('output-video.mp4')       // output file name
    .run();
  // Do whatever actions you want recorded...
})();
In this setup, Puppeteer drives the browser while FFmpeg records the display. The .input('screen-capture-stream') tells FFmpeg to grab the live browser screen, and .output(...) sets the file name.
By default the above code saves an MP4 at the given path. You can customize the output format, resolution, or codec via FFmpeg options. For example, to set 720p and 30fps:
ffmpeg()
  .input('screen-capture-stream')
  .output('output-video.mp4')
  .videoCodec('libx264')
  .size('1280x720')    // resolution
  .fps(30)             // frame rate
  .run();
You can also change the file extension or container (e.g. .webm, .avi) by adjusting .output(...). This lets you balance video quality against file size.
After recording, you’ll have a video file (e.g. output-video.mp4). You should store it in your desired folder; FFmpeg’s .output('./path/myvideo.mp4') controls this. It’s wise to use systematic naming (like timestamps) if you make many videos. For example, you could generate a filename using the current date/time:
const timestamp = new Date().toISOString().replace(/[:.]/g,'-');
const filename = `video-${timestamp}.mp4`;
ffmpeg().input('screen-capture-stream').output(`./videos/${filename}`).run();
This creates files like video-2025-08-02T15-30-00.mp4. FFmpeg also lets you tweak bitrate or compression to shrink the file; lower resolutions or reducing frame rate will make the output smaller.
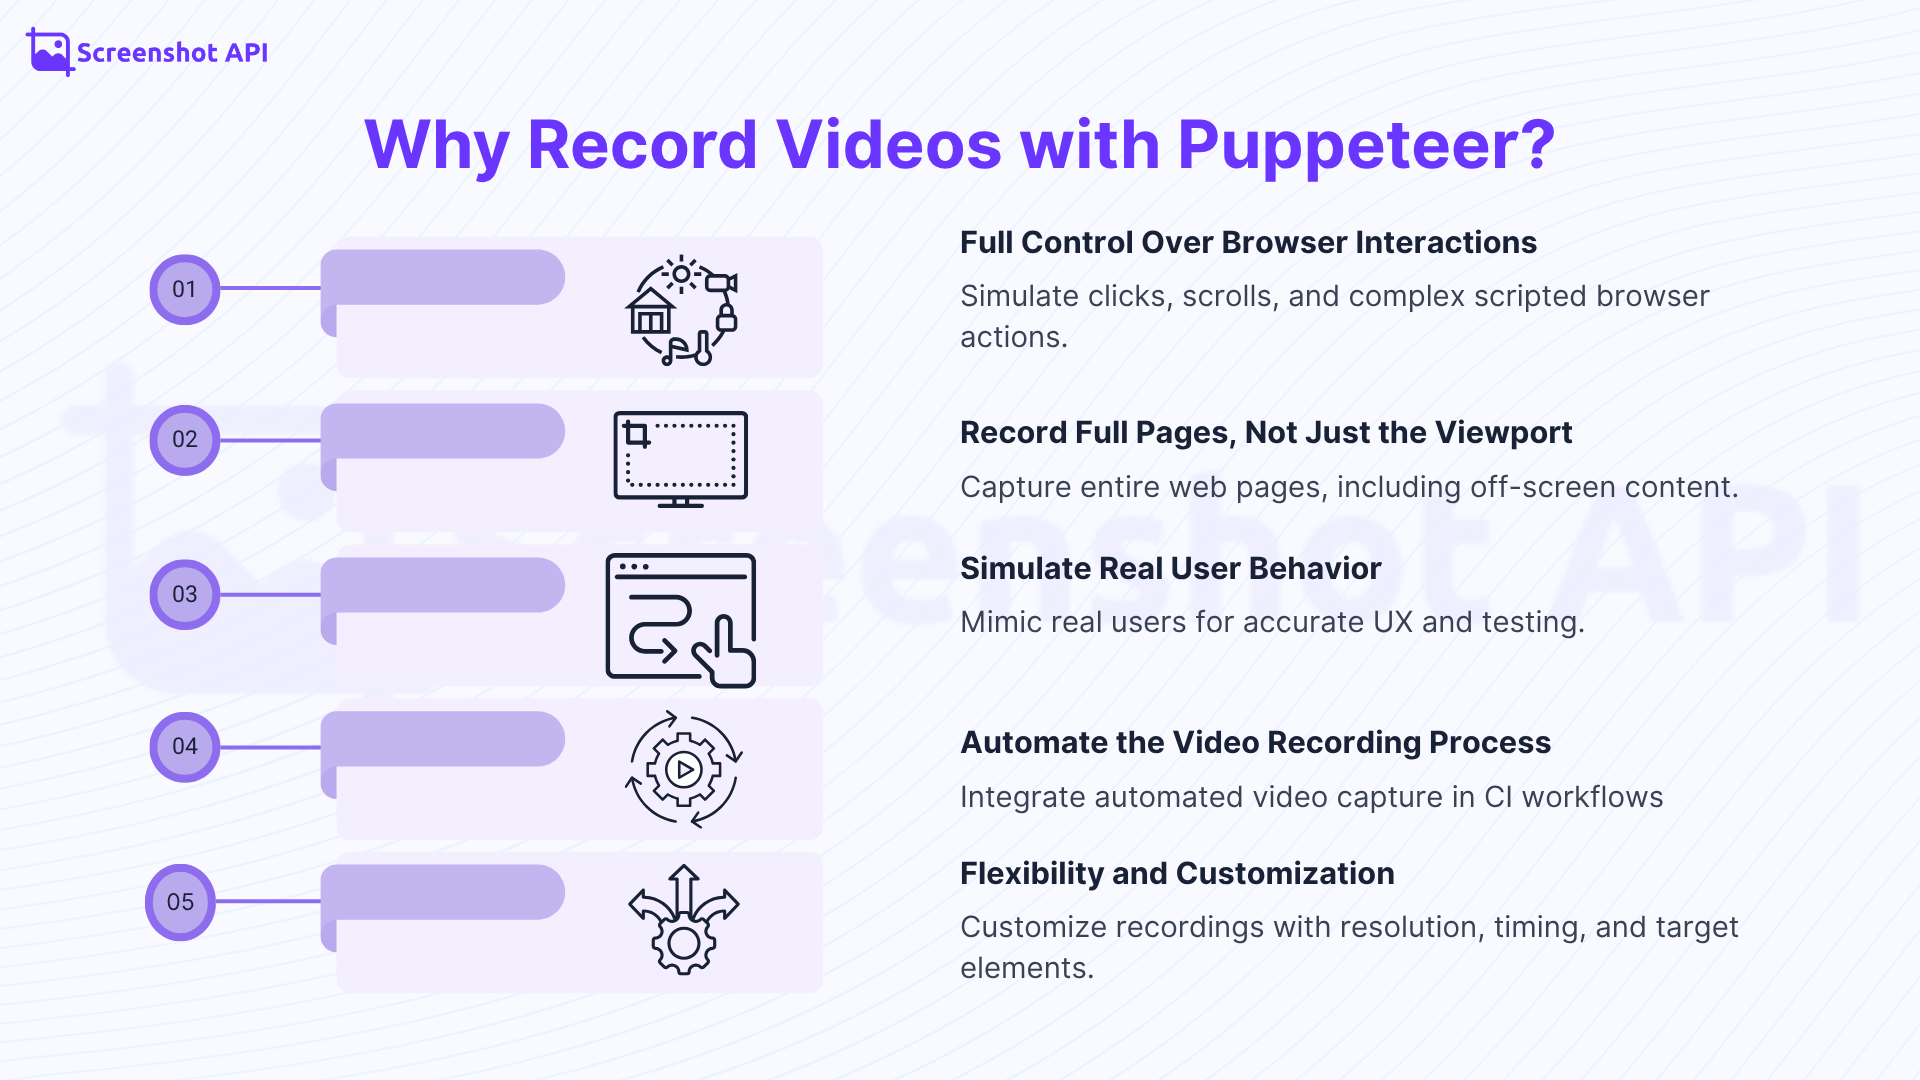
In summary, using Puppeteer for video recording gives you complete control you can script any interaction and record the full page, including off-screen content. However, it requires several setup steps and external tools (like FFmpeg).
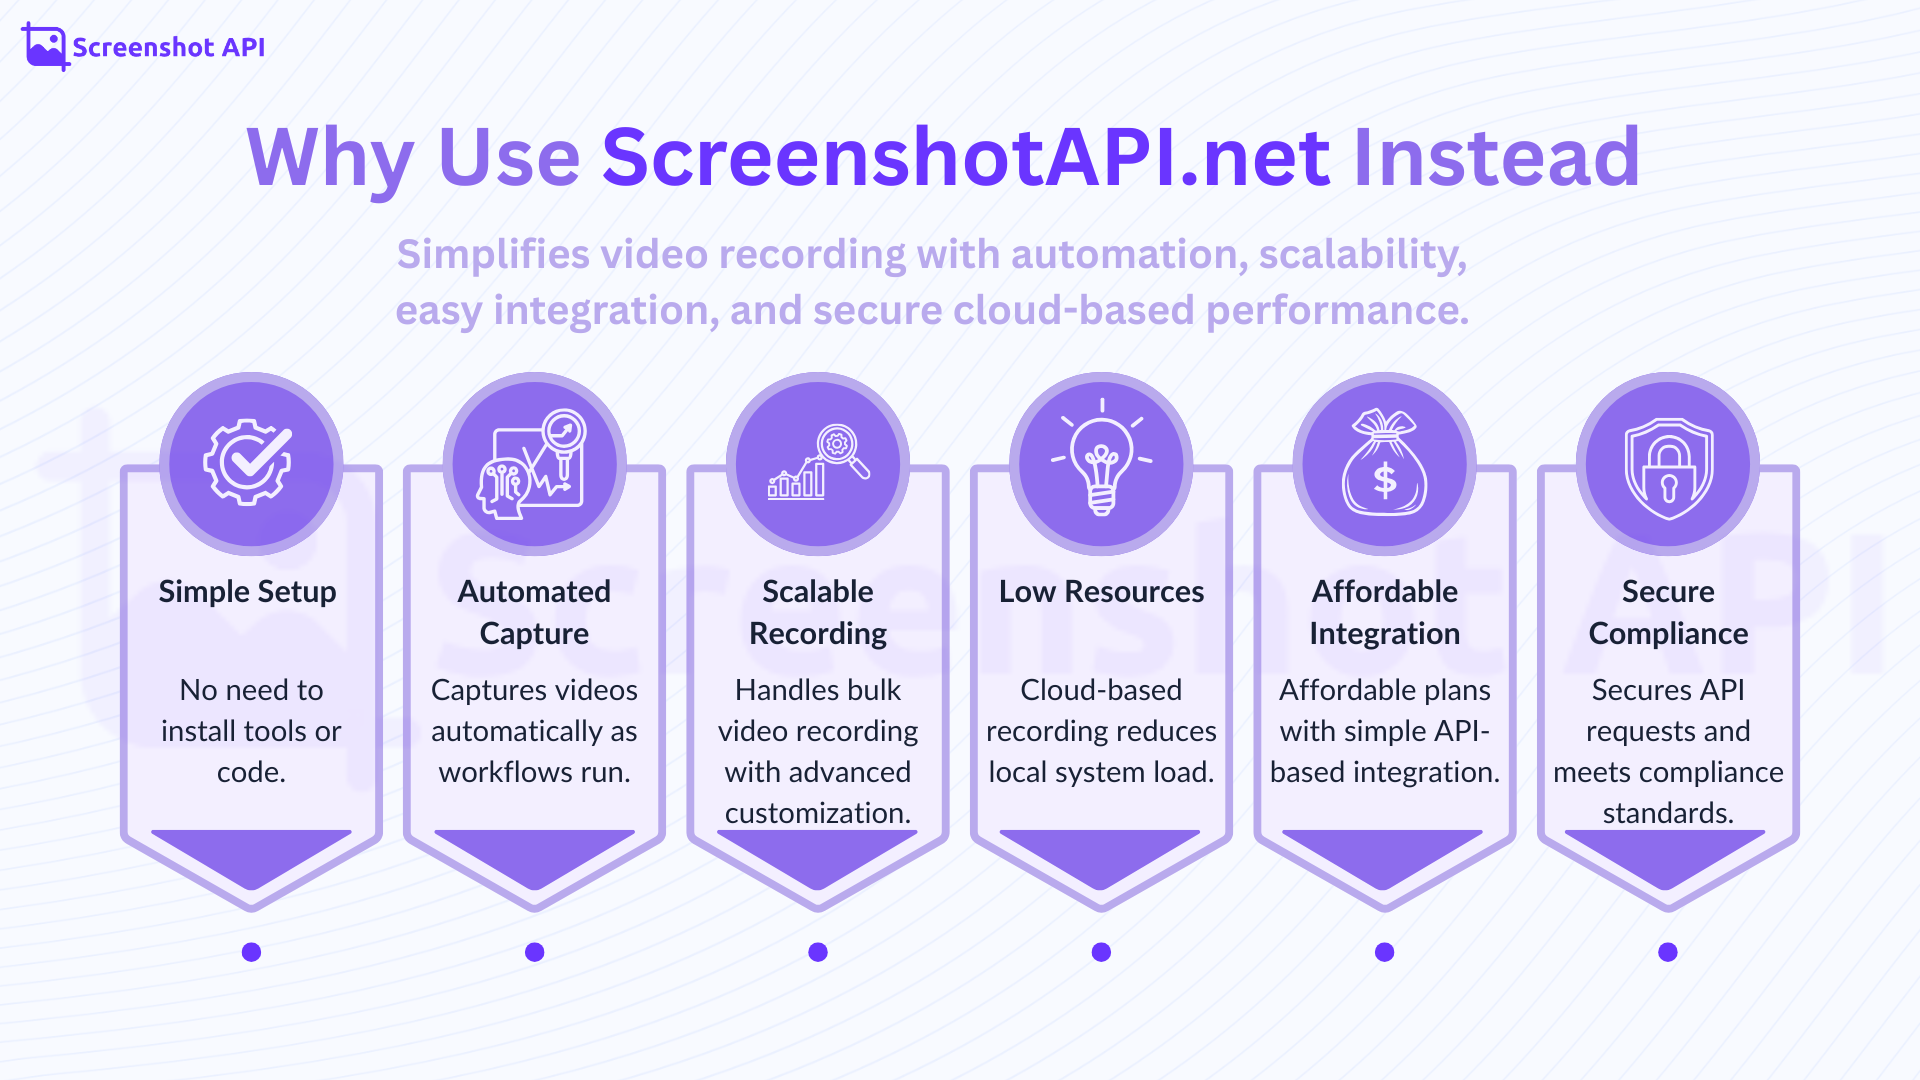
Instead of wiring everything yourself, ScreenshotAPI provides a cloud-based API that can capture webpage videos in one call. It offers a “video” feature that records a video (WebM, GIF or MP4) of a page as it scrolls. Essentially, you tell their service which URL to load and it does the browsing and recording on its servers.
To use it, you send a simple HTTP request. For example, in JavaScript:
axios.get('https://shot.screenshotapi.net/screenshot', {
  params: {
    token: 'YOUR_API_KEY',
    url: 'https://example.com',
    video: true     // tell ScreenshotAPI to capture video
  }
}).then(response => {
  console.log('Video recorded:', response.data.url);
});
This single API call (with your API key and URL) will produce a video of the page. ScreenshotAPI handles page loading, scrolling, and uses headless Chrome under the hood to create the recording. You don’t need to install FFmpeg or manage a local browser at all.
ScreenshotAPI handles modern website features like lazy-loaded content, single-page apps, and HTML5 videos automatically. You can adjust settings like screen size, choose a device to simulate, or even set a location in your request. The final result is sent back to you either as a video file or a JSON link to the video.
Since everything runs in the cloud, your own computer doesn’t need to do any heavy work. ScreenshotAPI can handle large numbers of requests easily and includes helpful tools like ad-blocking and secure HTTPS support. Unlike Puppeteer, you don’t need to write complex code or use tools like FFmpeg it’s a no-code solution that works with just a simple API call. There's also a free plan with 100 captures per month, along with paid options for more usage.
Puppeteer needs the software environment of Node.js and the combination of other tools such as FFmpeg. ScreenshotAPI requires just a little code, or even a simple GET request that contains video=true parameter. The major difference is that Puppeteer is potent, but it is a DIY application, whereas ScreenshotAPI is plug-and-play.
With Puppeteer you get full control over browser behavior you can script exactly which actions to perform and capture the entire page. ScreenshotAPI trades off some of that fine-grained control for simplicity: it automatically handles most dynamic content and full-page scrolling for you. It still offers custom parameters (viewport, remove cookie banners, etc.) but doesn’t expose every lower-level detail.
Using Puppeteer with FFmpeg on your own computer uses a lot of resources like CPU, GPU, and memory, especially when recording videos. It's also harder to scale if you need to record many pages. ScreenshotAPI works in the cloud and is built to handle large volumes. With just a few easy requests, you can record videos of dozens or even hundreds of web pages without overloading your system.
Puppeteer is free and open-source, but it takes time to set up and manage like installing Chrome, handling updates, and dealing with extra tools. ScreenshotAPI, on the other hand, charges based on how much you use it, but for small or new projects, it’s often free or very low cost. The benefit is that you don’t need to set up anything yourself no need to install a browser or use FFmpeg.
Both can handle modern sites, but ScreenshotAPI automatically waits for dynamic elements, videos, and animations, whereas with Puppeteer you often need to script waits or manually trigger actions before recording.
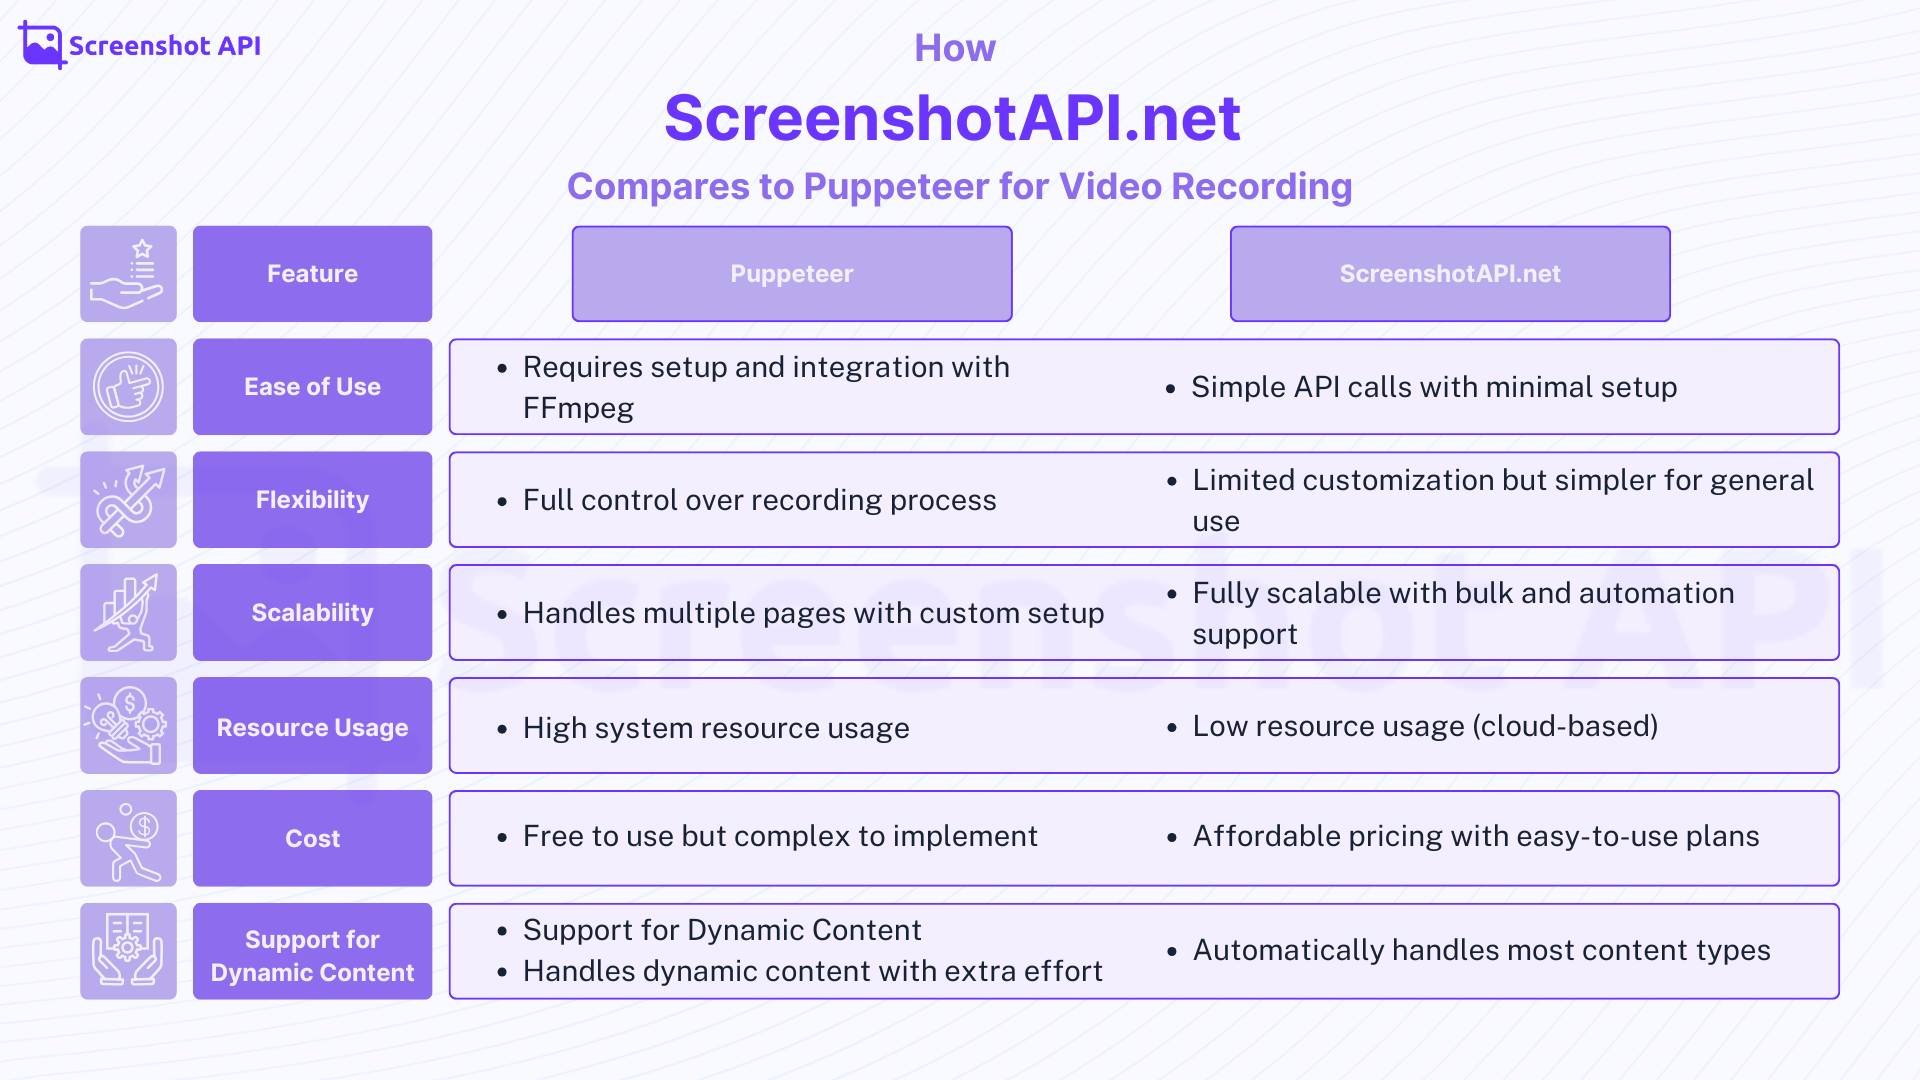
In sum, Puppeteer gives you maximum flexibility at the cost of setup complexity, while ScreenshotAPI offers simplicity and automation for common use cases.
Puppeteer is a powerful tool for web automation and, with extra effort, can record browser sessions to video. We walked through how to install Puppeteer, launch Chrome, and use FFmpeg to capture and save the video frames. This method lets you script exact user interactions and record entire pages (including scrolling). However, it requires installing and managing additional tools (like FFmpeg) and consuming local system resources.
By contrast, ScreenshotAPI simplifies everything. With just one API call you can get a video of any webpage, without writing scripts or configuring FFmpeg. ScreenshotAPI handles all the backend details page loading, scrolling, dynamic content and returns the video to you. For example, you can “automate video recording with minimal setup” and “capture both static and dynamic content” through simple parameters. This saves time and infrastructure cost by offloading the work to a cloud service.
Both approaches have their place: use Puppeteer when you need detailed, code-driven control or are already invested in Node.js automation. Use ScreenshotAPI when you want to quickly integrate video capture into your project with minimal code. Either way, you now have a clear understanding of how to record web page videos in both scenarios and can choose the best tool for your needs.
No, Puppeteer does not have built-in video recording capabilities, but you can use external tools like FFmpeg to record the screen during Puppeteer sessions.
You can record your screen using software like OBS Studio, Camtasia, or FFmpeg.
Puppeteer doesn’t natively support recording actions, but you can log interactions and use screen recording tools like FFmpeg to capture video.
To capture a video of a webpage, you can use Puppeteer for automation and FFmpeg for screen recording.


